Arduino Firmata Actor
-
Hi,
But the Firmata implementation does not replace the Serial interface group of actors -Serial In Watcher, Send Serial etc. does it? So in the overall scope of Isadora’s capability to interface with Arduino a simplified approach with Firmata will have no loss of extended functionality. As has been commented by a number of responses in this thread - the implementation is aimed at non-programmers and students/beginners. Some loss of extended functionality/limitation as a compromise towards simplicity and ease of use or as a quick prototyping, or introductory step to using a microcontroller with Isadora, is worth considering. Even as a non-programmer I know that I can turn to/take the next step towards serial functionality if I ever reach that level of sophistication with interfacing microcontrollers with Isadora.
So I think there is some merit in reflecting on a direct and albeit limited approach for the sake of plug and play simplicity.
Best wishes
Russell
http://bonemap.com | Australia
Izzy STD 4.1.3 | USB 4.1.3 | + Beta
MBP 14” 2022 M2 16GB | 26.1 Tahoe
Mac Studio 2023 M2 Ultra 128GB | 26.1 Tahoe
Mac Mini 2025 M4 Pro 64GB | 26.1 Tahoe
MBP 16” 2026 M5 Max 128GB | 26.5 TahoeA range of deployable older Macs
-
@bonemap said:
But the Firmata implementation does not replace the Serial interface group of actors -Serial In Watcher, Send Serial etc. does it?
No it does not replace them, it is an addition to the existing serial actors. This new actor will handle all the serial input and output internally.
We are always (painfully) mindful of backwards compatibility. We'd never take away an actor as fundamental as that.
Best Wishes,
MarkMedia Artist & Creator of Isadora
Macintosh SE-30, 32 Mb RAM, MacOS 7.6, Dual Floppy Drives -
@mark said:
We'd never take away an actor as fundamental as that.
And I would say there is good, workable documentation and instruction for using Arduino with the Serial In Watcher, Send Serial Data actors. It is available through Isadora knowledge base. At least enough for a non-programmer like myself to succeed.
Best wishes
Russell
http://bonemap.com | Australia
Izzy STD 4.1.3 | USB 4.1.3 | + Beta
MBP 14” 2022 M2 16GB | 26.1 Tahoe
Mac Studio 2023 M2 Ultra 128GB | 26.1 Tahoe
Mac Mini 2025 M4 Pro 64GB | 26.1 Tahoe
MBP 16” 2026 M5 Max 128GB | 26.5 TahoeA range of deployable older Macs
-
What are the advantages of serial communication for the opportunistic prototyper?
I believe the future of accessible micro-controlling is ESP32 (web server, bluetooth low energy, processing power) and Teensy (Out of the box HID or Midi interface).
Mac M2 Ultra, 64gb — Berlin
-
@fubbi said:
What are the advantages of serial communication for the opportunistic prototyper?
That's a separate discussion, which you can most certainly start a thread about. Let's stick to the question at hand, OK? (Most Arduinos come with a USB serial interface connector that appears as a serial connection, as you know.)
Best Wishes,
Mar -
@bonemap said:
And I would say there is good, workable documentation and instruction for using Arduino with the Serial In Watcher, Send Serial Data actors. It is available through Isadora knowledge base. At least enough for a non-programmer like myself to succeed.
I'm mostly going on the multiple requests I've gotten on this over the years. On the Facebook post I made about this, several educators were immediately enthusiastic, so I would see merit in finishing this up. (It was basically two days of time while I waited for the team to test other stuff.)
Best Wishes,
MarkMedia Artist & Creator of Isadora
Macintosh SE-30, 32 Mb RAM, MacOS 7.6, Dual Floppy Drives -
Super happy to get hands on with the Arduino Firmata implementation - if it is ready let’s try it.
Best wishes
Russell
-
by knowing about ESP32 you already know about the Arduino more than the focus group for this actor and I would recommend just using the serial actors.
Reading the comments here, I think there is some good insights. as to the practical question of how you would implement an auto populated actor: after populating you would set the ins and outs to "none". If you then set one of the pins to be output, you disable the input field and vice versa, so it cannot be modified anymore.
Also, in regards to it being too many options: there are a fair few actors that have this. I don't think it is that much of a worry. however, you could go the route of only show the first 4 pins and add in the "help" section that you can enable more capabilities.
-
@tonyschuite @bonemap @liminal_andy @juriaan
So, I've listened to all you have to say, and made substantial changes to the actor. I've explained how it's working now in this video, as it was easier to do this than to write it all out.
Please let me know if you think will help make this accessible to beginners and students who might use this actor.
Best Wishes,
MarkMedia Artist & Creator of Isadora
Macintosh SE-30, 32 Mb RAM, MacOS 7.6, Dual Floppy Drives -
Chapeau. That looks amazing and simple enough for students/people that never touched Arduino before. Just tell the system what you want, and be done with it :)
I could not wish for anything more, I love that it also labels the names of the Input / Output of the actor with the Pin / Type of pin that you generated. PWM, Analog, Digital, Encoder and Servo.
-
@mark said:
I've explained how it's working now in this video
That appears very straight forward! nice solution with the innovation of the button to generate/automate connection ports, which I don't recall being apart of any other Isadora actor. Is it just Arduino's or are other boards suitable?
So the process would be grab the Firmata Standard Arduino Code and load it onto whatever flavour of board is at hand - using the Arduino IDE or similar. Connect the board through USB to the Serial Setup in Isadora as usual. Run the Firmata actor and check for a connection by observing the 'firmware' output. Determine what input and output ports are required for the project, enter these parameters and click the generate button - start linking data throughput with the rest of the patch.
Great !
What happens if I decide I need more ports after I have generated the initial ones can I go back and add through the same process or do I need to add through the edit text parser?
Best Wishes
Russell
http://bonemap.com | Australia
Izzy STD 4.1.3 | USB 4.1.3 | + Beta
MBP 14” 2022 M2 16GB | 26.1 Tahoe
Mac Studio 2023 M2 Ultra 128GB | 26.1 Tahoe
Mac Mini 2025 M4 Pro 64GB | 26.1 Tahoe
MBP 16” 2026 M5 Max 128GB | 26.5 TahoeA range of deployable older Macs
-
@bonemap said:
Are other boards suitable?
This actor relies the Firmata protocol, which allows things like asking the board what it's capabilities are (e.g. how many pins do you have? what can they do?) So if the board (whatever it is) runs Firmata, it would work.
So the process would be grab the Firmata Standard Arduino Code and load it onto whatever flavour of board is at hand - using the Arduino IDE or similar. Connect the board through USB to the Serial Setup in Isadora as usual. Run the Firmata actor and check for a connection by observing the 'firmware' output. Determine what input and output ports are required for the project, enter these parameters and click the generate button - start linking data throughput with the rest of the patch.
Yes, that's it.
What happens if I decide I need more ports after I have generated the initial ones can I go back and add through the same process or do I need to add through the edit text parser?
Well, right now it would overwrite whatever's there. If you've not modified it by hand, no biggie. But otherwise you'd lose your changes.
But if @tonyschuite agrees that this would make it easy for the students he teachers, I'll get this ready for distribution so people can try it.
Best Wishes,
MarkMedia Artist & Creator of Isadora
Macintosh SE-30, 32 Mb RAM, MacOS 7.6, Dual Floppy Drives -
-
@mark this is awesome!!! Really fantastic!!
-
Hi,
The Actor is amazing as is but Some additional reflecting on the procedure outlined in your video. There is an element of guess work in letting the actor report back on the availability of ports. I think I would want to know what a board is capable of before making the setting port parameters and generating them. If the board rejected a parameter setting I would want to know why.
A little online research into the specification of a particular board would probably be all that is required. Another approach might be to consider having an option to reveal the full capacity of the board through the actor- so there is some clear guideline to what the board is capable of before setting port assignments. Could the process be, using the existing actor as proposed, to trigger settings with an aim to reveal all of the the boards potential ports and then pair back/assign the ports on a second pass?
Or perhaps a dialog is populated with the boards port type and capacity when I select the port number... then I would be equiped with the information required to make appropriate port assignments for the board..
The demonstrated actor is great as is - so these are just additional thoughts.
Best wishes
Russell
http://bonemap.com | Australia
Izzy STD 4.1.3 | USB 4.1.3 | + Beta
MBP 14” 2022 M2 16GB | 26.1 Tahoe
Mac Studio 2023 M2 Ultra 128GB | 26.1 Tahoe
Mac Mini 2025 M4 Pro 64GB | 26.1 Tahoe
MBP 16” 2026 M5 Max 128GB | 26.5 TahoeA range of deployable older Macs
-
@mark Amazing work Mark !
The only thing I don't understand in the video is why outputs are on the right in the actor and inputs on the left....
Ciao !
Armando Menicacci
www.studiosit.ca
MacBook Pro 16-inch, 2021 Apple M1 Max, RAM 64 GB, 4TB SSD, Mac OS Sonoma 14.4.1 (23E224) -
@armando said:
why outputs are on the left in the actor and inputs on the right
Hi,
I know! I did a second take of that as well! But if you think of the actor module as a simulacrum/stand-in for the board itself it makes more sense. If I have a sensor attached to the Arduino it is an input therefore it is labeled as an input in the Isadora module. If I wanted to send current information to a servo motor or a relay it is an output on the board and therefore labelled an output in the module.
Best Wishes
Russell
-
@armando said:
The only thing I don't understand in the video is why outputs are on the right in the actor and inputs on the left....
I debated this because I knew someone would feel like it's backward. But just think about it for the second
The definition is talking about PINS, which are physical input or output pins on the Arduino board.
For a physical input pin on the Arduino board, data will enter the input pin and the board will pass the incoming data on to Isadora. Thus, you need an output on the actor.
For a physical output pin on the Arduino board, Isadora must to send data to the Arduino so it can pass that data to the output pin. Thus you and you need an input on the actor.
Refer again to the Firmata Test App screen shot:
This is defining the PINS on the Arduino board, as either inputs or outputs. The specification does the same.
But the fact that someone as experienced as you found this confusing does not encourage me that I've made the right choice. Hmmmmmm.
Best Wishes,
MarkMedia Artist & Creator of Isadora
Macintosh SE-30, 32 Mb RAM, MacOS 7.6, Dual Floppy Drives -
@bonemap said:
Or perhaps a dialog is populated with the boards port type and capacity when I select the port number... then I would be equipped with the information required to make appropriate port assignments for the board..
This is a reasonable idea, but it is not doable because there is no ability for actors to show a dialog. (We're leading up to the Big Sur release, and the code is frozen while we go through final tests. I simply can't add that capability to the 3.0.8 release, which means such a new feature will need to wait for the next version.)
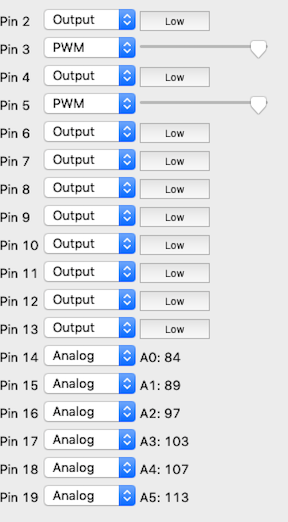
So what I've done is as follows: here's the new automatically generated output when you trigger the 'gen spec' input. It now inserts a list of the board capabilities.
Additionally, if one or more of the requested pins could not be generated, it inserts a comment describing which pins and how many could not be generated (see GEN SPEC ERROR.) It also shows "error: not enough pins" at the status output instead of "ready."
// GEN SPEC ERROR: Some of the requested pins could not be generated.
// GEN SPEC ERROR: for pin mode ENCODER OUTPUT, none of the 3 pins requested were generated.
// GEN SPEC ERROR: for pin mode PWM OUTPUT, only 2 of the 4 pins requested were generated.
// START OF BOARD CAPABILITIES
//
// PIN 2: DIGITAL INPUT / DIGITAL OUTPUT / SERVO OUTPUT / PULLUP INPUT
// PIN 3: DIGITAL INPUT / DIGITAL OUTPUT / PWM OUTPUT / SERVO OUTPUT / PULLUP INPUT
// PIN 4: DIGITAL INPUT / DIGITAL OUTPUT / SERVO OUTPUT / PULLUP INPUT
// PIN 5: DIGITAL INPUT / DIGITAL OUTPUT / PWM OUTPUT / SERVO OUTPUT / PULLUP INPUT
// PIN 6: DIGITAL INPUT / DIGITAL OUTPUT / PWM OUTPUT / SERVO OUTPUT / PULLUP INPUT
// PIN 7: DIGITAL INPUT / DIGITAL OUTPUT / SERVO OUTPUT / PULLUP INPUT
// PIN 8: DIGITAL INPUT / DIGITAL OUTPUT / SERVO OUTPUT / PULLUP INPUT
// PIN 9: DIGITAL INPUT / DIGITAL OUTPUT / PWM OUTPUT / SERVO OUTPUT / PULLUP INPUT
// PIN 10: DIGITAL INPUT / DIGITAL OUTPUT / PWM OUTPUT / SERVO OUTPUT / PULLUP INPUT
// PIN 11: DIGITAL INPUT / DIGITAL OUTPUT / PWM OUTPUT / SERVO OUTPUT / PULLUP INPUT
// PIN 12: DIGITAL INPUT / DIGITAL OUTPUT / SERVO OUTPUT / PULLUP INPUT
// PIN 13: DIGITAL INPUT / DIGITAL OUTPUT / SERVO OUTPUT / PULLUP INPUT
// PIN 14: DIGITAL INPUT / DIGITAL OUTPUT / ANALOG INPUT / SERVO OUTPUT / PULLUP INPUT
// PIN 15: DIGITAL INPUT / DIGITAL OUTPUT / ANALOG INPUT / SERVO OUTPUT / PULLUP INPUT
// PIN 16: DIGITAL INPUT / DIGITAL OUTPUT / ANALOG INPUT / SERVO OUTPUT / PULLUP INPUT
// PIN 17: DIGITAL INPUT / DIGITAL OUTPUT / ANALOG INPUT / SERVO OUTPUT / PULLUP INPUT
// PIN 18: DIGITAL INPUT / DIGITAL OUTPUT / ANALOG INPUT / SERVO OUTPUT / I2C OUTPUT / PULLUP INPUT
// PIN 19: DIGITAL INPUT / DIGITAL OUTPUT / ANALOG INPUT / SERVO OUTPUT / I2C OUTPUT / PULLUP INPUT
//
// END OF BOARD CAPABILITIES
// AUTOMATICALLY GENERATED PIN SPECIFICATION
//
PIN 14 "pin 14: analog input"  ANALOG INPUT                "No help yet available."
PIN 15 "pin 15: analog input"  ANALOG INPUT    0     1023  "No help yet available."
PIN 16 "pin 16: analog input"  ANALOG INPUT                "No help yet available."
PIN 17 "pin 17: analog input"  ANALOG INPUT    0     1023  "No help yet available."
PIN 18 "pin 18: analog input"  ANALOG INPUT                "No help yet available."
PIN 19 "pin 19: analog input"  ANALOG INPUT    0     1023  "No help yet available."
PIN 2  "pin 2: digital input"  DIGITAL INPUT               "No help yet available."
PIN 3  "pin 3: digital input"  DIGITAL INPUT   0     1     "No help yet available."
PIN 4  "pin 4: digital input"  DIGITAL INPUT               "No help yet available."
PIN 5  "pin 5: digital input"  DIGITAL INPUT   0     1     "No help yet available."
PIN 6  "pin 6: digital output" DIGITAL OUTPUT              "No help yet available."
PIN 7  "pin 7: digital output" DIGITAL OUTPUT  0     1     "No help yet available."
PIN 8  "pin 8: digital output" DIGITAL OUTPUT              "No help yet available."
PIN 9  "pin 9: digital output" DIGITAL OUTPUT  0     1     "No help yet available."
PIN 10 "pin 10: pwm output"    PWM OUTPUT                  "No help yet available."
PIN 11 "pin 11: pwm output"    PWM OUTPUT      0     255   "No help yet available."
That ought to cover all the bases here.
Best Wishes,
Mark -
@mark Got it. Thanks for taking the time
