If you can find a suitable cube LUT, for converting rec 2020 to rec 709, you could use my 'color grading' shader (TROIKATRONIX : ISADORA - DX – PY – Cube2LUT – ColorGrading).
This should allow you to convert the color, but will not be as true to source as making the conversion in something like Davinci Resolve (my recommended option).
Hello
The color space you have specified (rec.2020) requires playback hardware specific for the wide color range associated with the gamut. It is indicated that “very few displays can fully reproduce 100% of Rec. 2020 today, making it a benchmark goal for next-generation display technologies like Quantum Dot and Mini-LED.“
You may need to transpose your video in editing software or apply additional Isadora actor filters to reach your expected results.
Best wishes
Russell
Ai translate:
Hola
El espacio de color que ha especificado (rec.2020) requiere hardware de reproducción específico para la amplia gama de colores asociada con la gama. Se indica que "muy pocas pantallas pueden reproducir completamente el 100% de Rec. 2020 hoy, lo que lo convierte en un objetivo de referencia para las tecnologías de pantalla de próxima generación como Quantum Dot y Mini-LED".
Es posible que deba transponer su vídeo en el software de edición o aplicar filtros adicionales de actores de Isadora para lograr los resultados esperados.
Recuerdos
Hola a tod@s!! Soy nueva en el foro y hace poco usando Isadora v4.5.1. Mis videos están grabados con Iphone 16 pro en Prores 422HQ, PCM LINEAL y REC.2020 HLG así en Isadora su color es más tenue de lo normal, podría configurar Isadora de algún modo para ver el video en su color correcto? que puedo hacer? Mil gracias
Honestly this confused me too when I was buying my first projector. Lumens measure total light output from the projector itself, while lux measures how bright that light appears on the screen - lux depends on both lumens and screen size. So same projector will have higher lux on smaller screen and lower lux on bigger screen. For comparing projectors, always use lumens since that's the consistent measurement regardless of screen size.
I use an Optoma projector and when I was evaluating, I focused on ANSI lumens specifically - that's the standardized measurement. Some cheap brands advertise "LED lumens" or "peak lumens" which are inflated numbers, not real brightness. For dark rooms 2000 ANSI lumens is fine, ambient light rooms need 3000+. Don't get fooled by high lux numbers on small demo screens in stores - always ask for ANSI lumens rating before deciding.
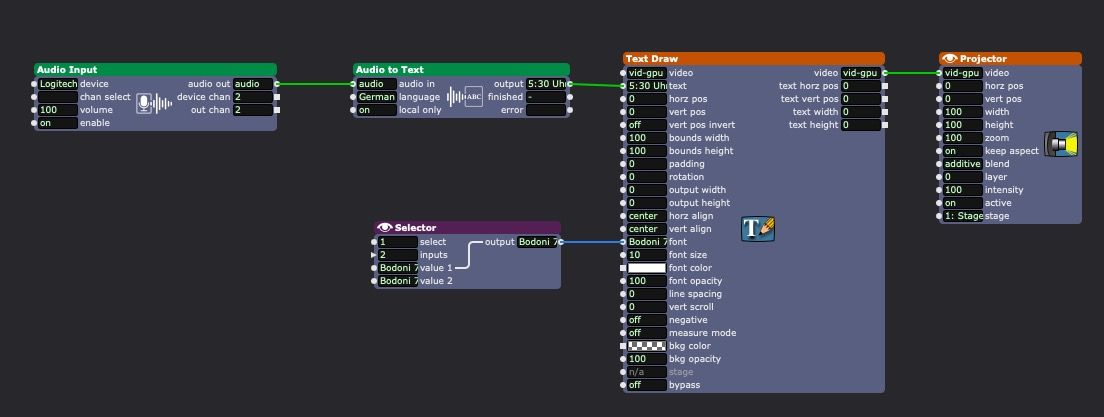
a workaround is to use a font with a capital version like Bodoni 72 and Bodoni 72 small caps and to switch between both.
 Best regards
Jean-François
Hello Isadoramongers, quick test of a feature request: Caps Lock input for the Text Draw actor. (I never needed it before, but now there's the Speech to Text actor to play around with, it would be lovely to be able to dynamically control whether the text generated is in lower case or capitals)
@dbini said:
the text builds up over time. if you go directly from Audio to Text into Text Draw, it resets at the end of each sentence.
Not sure if this helps at all
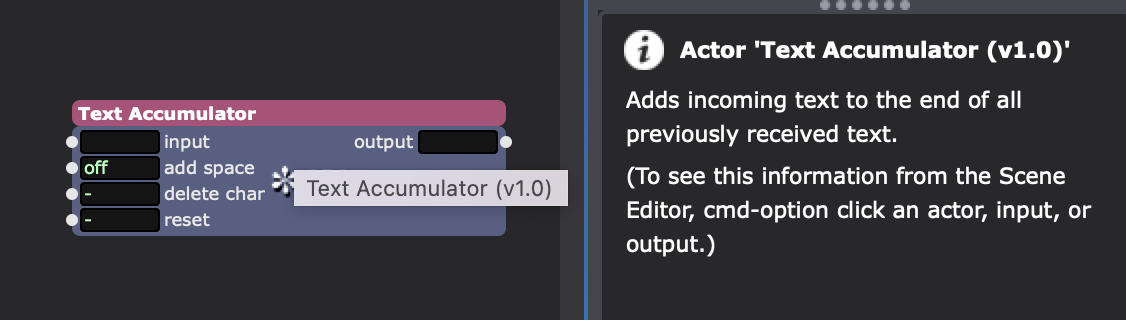
Also just gunna throw these in here for good measure. Maybe I made something before that you might find useful: js-text-user-actors.zip
- although, after experimenting, the system works in a slightly different way, in that now the text builds up over time. if you go directly from Audio to Text into Text Draw, it resets at the end of each sentence. Im sure there's a way to add a reset trigger to the Javascript.
Thanks Ryan, I suspected there would be a codey way to format the text. Still, I think it would be a nice addition to the Text Draw.