Sending data via OSC to an ESP8226
-
I am sending data to an ESP8226 but the ESP8226 always receives the same data 4294967295. Have I missed something?
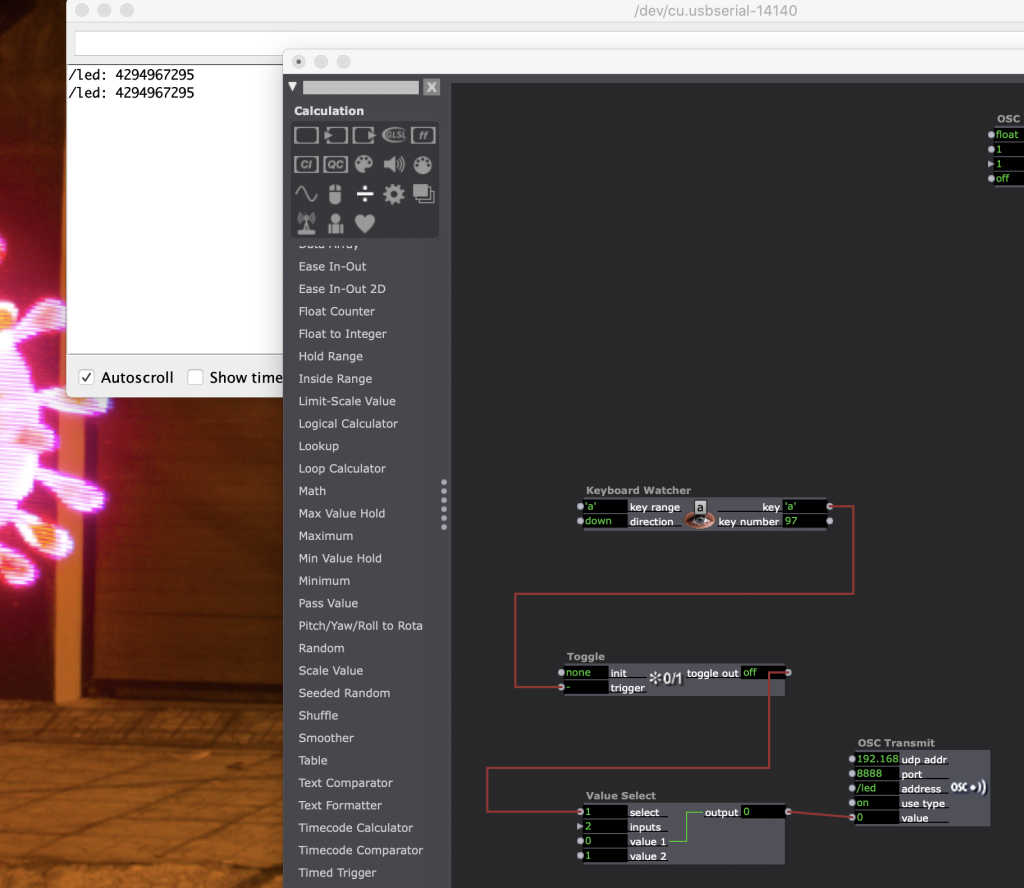
The Arduino sketch is the example from the OSC library OSC_recieve.ino.zip
Running: Asus ROG Strix G16
Processor Intel(R) Core(TM) i7-14650HX (2.20 GHz)
Installed RAM 64.0 GB
GPU NVIDIA RTX5060located in Da Nang, Vietnam.
Github https://github.com/agentsimon -
Hi,
I am not sure what you are doing to give you the right advice. First, do you have the right osc message coming through the Isadora monitor? : windows/show monitor
You should a see a similar osc message to the one in this screen grab:
It shows the ip address of the WiFi micro-controller
The message identifier, in my case "/nodemcu/1"
and that it has sent data in the form of 1 float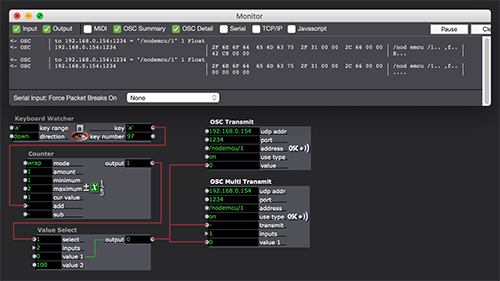
You could try the 'OSC Multi Transmit' with the 'transmit' trigger to see if that kicks in.
Are you using a dedicated WiFi router for your development?
What does the micro-controller code look like?
Best Wishes
Russell
-
You are sending a 32 bit floating point number. Here's the Monitor output for your patch, which I recreated.

After the name (/led) there are four bytes of type tags -- ",f..", represented as 2C 66 00 00 in hexadecimal reprepsentation. The comma means "here comes the type tags" and the 'f' means there will be a 32-bit floating point value and the 0 byte after that means "no more type tags." The type tags are always padded to take up a multiple of 4 bytes, so there's an extra 0 byte becayse of that.
After this comes the actual value. A value of 0.0 is represented as 00000000 and the value 1.0 is represented by the 32 bit value 3f800000 (both given in hexadecimal representation).
My guess is either a) you're reading the type tag as the value, b) your code is not honoring the type tags, or c) you're mistakenly interpreting the floating point number as an integer.
If you want the OSC Transmit to output a 32 bit integer, you need to connect something with an integer output. For example:
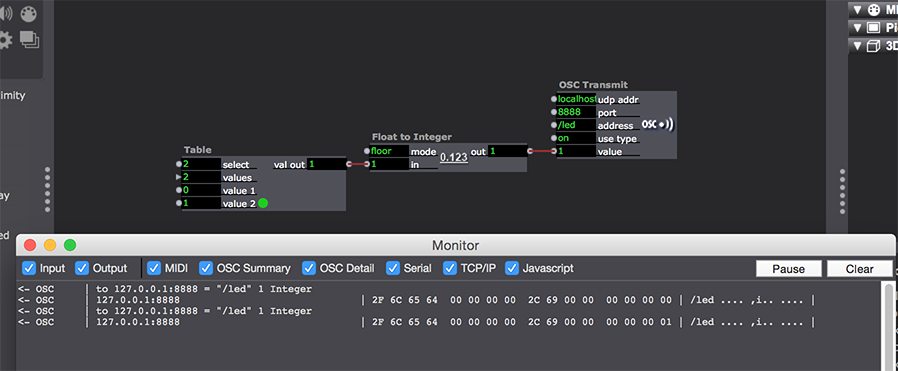
By connecting an integer output to the mutable input of the OSC Listener, Isaodra knows that the OSC output should be an integer instead of a floating point number
Notice that the type tags are now say ",i00", which means there is a single 32 bit integer. And that the two numbers are now 00000000 and 00000001 (hex).
I have a feeling this will solve your problem.
Best Wishes,
Mark -
Hi,
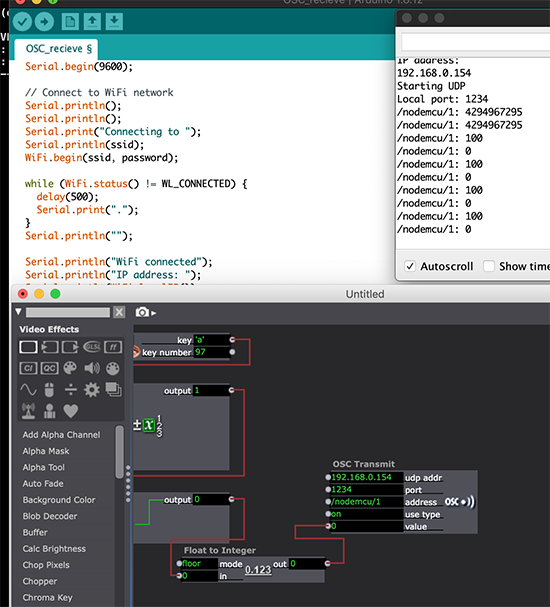
That's a nice explanation. Thanks @mark. Very useful. I ran a reconstruction of your patch with a NodeMCU I am currently using and parsed the code through Arduino IDE it worked without issue. @Mark's advice did the trick!
I also note that another code and patch worked to operate an APA102 RGB LED without having to use the float to integer conversion.
Best Wishes
Russell
-
Awesome..yes Mark that was the solution..sending the wrong type of data to the ESP8226. I didn't know about the monitor which is extremely useful.
Russell I am using a WeMos D1 mini. I just received an ESP8226 with a little LCD so I will see what that can do. I am using my home router but could set the ESP8226 as a Soft Access Point. Not sure why but there might be an advantage in it over using the router. I see there is an ESP Now protocol for sending and receiving small amounts of data which looks interesting.
Thanks again. Stay safe
Simon
Running: Asus ROG Strix G16
Processor Intel(R) Core(TM) i7-14650HX (2.20 GHz)
Installed RAM 64.0 GB
GPU NVIDIA RTX5060located in Da Nang, Vietnam.
Github https://github.com/agentsimon -
@agentsimon2 said:
ESP Now protocol
That sounds interesting. Although, I still think OSC is a good option because it has been widely adopted in creative software and the implementation in Isadora is straight forward for the most part.
Kind Regards
Russell
-
Yes I agree..not much point in reinventing the wheel. Maybe it is better to have a master ESP that all the other ESP report to or take commands from using ESP Now. The master ESP (bow down to the mighty overlord) then uses OSC to talk to Isadora. Why do this? ESP Now is its own network, no web server necessary, so its fast to get going and reliable.
I think for now I'll continue my explorations with the ESP using OSC. Lock down has slowed deliveries down of postal orders and I'm starting to go a bit stir crazy
-
@agentsimon2 said:
ESP Now is its own network, no web server necessary
Hi,
I did have a quick look at coding a board as a
ESP8266WebServer
and then controlling pins through a board generated webpage with html form buttons to to turn pins off/on (low/high). After being unsuccessful with the TCP Stream Control module in Isadorai.e. not getting a sustained connection, I have gone back to OSC and using Isadora to send control messages....
#include <WiFiClientSecure.h>
#include <ESP8266WiFi.h>
#include <ESP8266WiFiMulti.h>
#include <WiFiUdp.h>
#include <ESP8266WiFiType.h>
#include <ESP8266WiFiAP.h>
#include <WiFiClient.h>
#include <WiFiServer.h>
#include <ESP8266WiFiScan.h>
#include <ESP8266WiFiGeneric.h>
#include <ESP8266WiFiSTA.h>
#include <ESP8266WiFi.h>
#include <WiFiClient.h>
#include <ESP8266WebServer.h>
int motor0 = 10;               // the pin the motor0 is attached to
int motor1 = 0;               // the pin the motor1 is attached to
                                /* Set these to your desired credentials. */
const char *ssid = "Nerve01"; //Enter your WIFI ssid
const char *password = "****"; //Enter your WIFI password
ESP8266WebServer server(80);
                                /* html forms for the webpage control. */
void handleRoot() {
  server.send(200, "text/html", "<form action=\"/motor0_on\" method=\"get\" id=\"form1\"></form><button type=\"submit\" form=\"form1\" value=\"On\">M0-On</button><form action=\"/motor0_off\" method=\"get\" id=\"form2\"></form><button type=\"submit\" form=\"form2\" value=\"Off\">M0-Off</button><form action=\"/motor1_on\" method=\"get\" id=\"form3\"></form><button type=\"submit\" form=\"form3\" value=\"On\">M1-On</button><form action=\"/motor1_off\" method=\"get\" id=\"form4\"></form><button type=\"submit\" form=\"form4\" value=\"Off\">M1-Off</button>");
}
void handleSave() {
  if (server.arg("pass") != "") {
    Serial.println(server.arg("pass"));
  }
}
void setup() {

  pinMode(motor0, OUTPUT);
  pinMode(motor1, OUTPUT);

  delay(3000);
  Serial.begin(115200);
  Serial.println();
  Serial.print("Configuring access point...");
  WiFi.begin(ssid, password);
  while (WiFi.status() != WL_CONNECTED) {
    delay(500);
    Serial.print(".");
  }
  Serial.println("");
  Serial.println("WiFi connected");
  Serial.println("IP address: ");
  Serial.println(WiFi.localIP());   // look at the serial monitor for the boards IP address to use in the web browser
  server.on ( "/", handleRoot );
  server.on ("/save", handleSave);
  server.begin();
  Serial.println ( "HTTP server started" );
  server.on("/motor0_on", []() {
    digitalWrite(motor0, 1);
    Serial.println("M0-on");
    handleRoot();
  });
  server.on("/motor0_off", []() {
    digitalWrite(motor0, 0);
    Serial.println("M0-off");
    handleRoot();
  });
   server.on("/motor1_on", []() {
    digitalWrite(motor1, 1);
    Serial.println("M1-on");
    handleRoot();
  });
  server.on("/motor1_off", []() {
    digitalWrite(motor1, 0);
    Serial.println("M1-off");
    handleRoot();
  });
}

void loop() {
  server.handleClient();
}