How to warp a video mapping
-
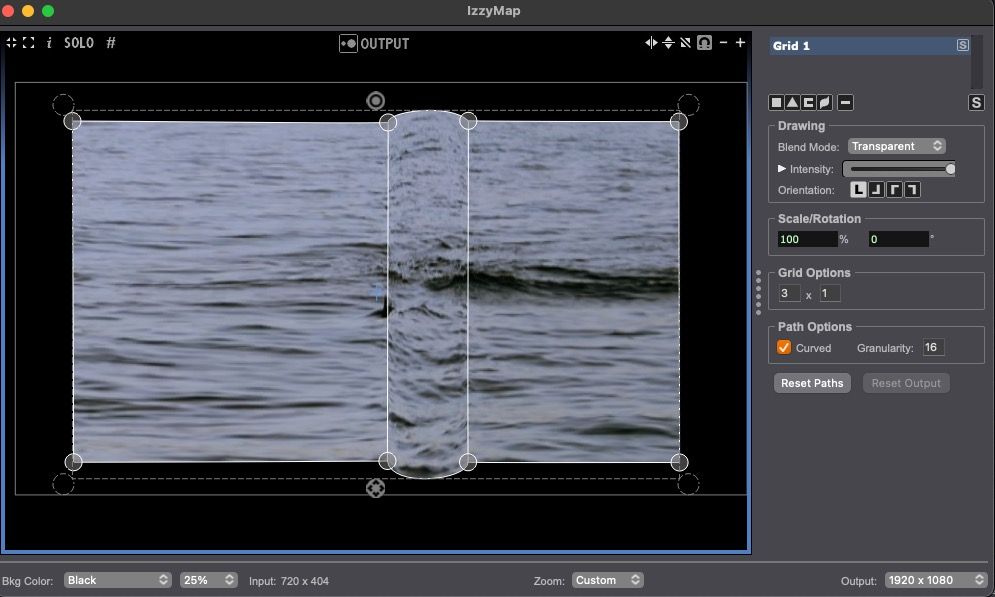
Hi All - I have done lots of mapping in my time, but now I'm stuck. I'm projecting a thin vertical video of water/waves onto a 600 cm diameter vertical column using a short throw projector. Using IzzyMap of course... I want the waves more or less "level" across the column and the top and bottom of the thin video rounded to appear to wrap the column. I have used composite on the input for the rounded without luck and tried the grid setting for leveling. I have used just a few grid points thinking moving one might warp the rest of the points, but that didn't seem to work. I tried using 25 points on the long, vertical side and 4 on the horizontal and that didn't seem to work well at all. The bezier handles are so small and white, while my video is very light too. I made a dark grid image to test but I can't get that to warp the way I want it to.
Is there a way of using the grid to warp a column? For what it's worth, I have watched the guru session on mapping several times and read all there is on the Troika website on mapping too. Sorry to be dense and looking forward to any suggestions! - JohnMBP'21- M1-Max; Sonoma 14.7; Isadora: 4.5.1 (ARM) ---- artwork: terragizmo.net
-
Ideas:
- Try using 3D
- Get a .3ds file of a column/cylinder (You should be able to use this .3ds file (though you'll need to modify it to make it taller either using the 3D Player or, failing that, Cheetah3D)
- Import the .3ds file into Isadora
- Drag it into the Scene Editor from the Media View to create a 3D Player actor
- Connect a Movie Player with your video content to the 'texture map' input of the 3D Player actor so it wraps your video around the 3d object
- Adjust the 3D Player actor and/or a 3D Stage Orientation actor until the content achieves the look you want on the column.
- Try having an LLM write GLSL shader code to create a "cylinder warp" effect. (If you do this, feed it the section named "Tutorial 6: Adding GLSL Shaders to the Toolbox" from this article first and the example GLSL shader codes below so that it understands how GLSL shader code works in Isadora.)
Example Code 1:
/* TT Bulge Distortion - Fragment Shader version v1.0 Created for Isadora by Mark Coniglio Based on Code in GPUImage by Brad Larsen https://github.com/BradLarson/GPUImage */ // ISADORA_PLUGIN_NAME("TT Pinch Distortion") // ISADORA_PLUGIN_DESC("Creates a 'pinch' effect centered at the point specified specified by the 'horz center' and 'vert center' inputs. You can adjust size and intensity of the pinch using the 'radius' and intensity' inputs.") // ISADORA_FLOAT_PARAM(radius, radi, 0, 200, 100, "Radius of the pinch effect."); uniform float radius; // ISADORA_FLOAT_PARAM(intensity, intn, -1000.0, 1000.0, 100, "Intensity of the pinch effect."); uniform float intensity; // ISADORA_FLOAT_PARAM(horz_center, ctrx, -100.0, 100.0, 0, "Horizontal center of the pinch effect."); uniform float horz_center; // ISADORA_FLOAT_PARAM(vert_center, ctry, -100.0, 100.0, 0, "Vertical center of the pinch effect."); uniform float vert_center; uniform vec2 resolution; uniform sampler2D tex0; void main() { float aspect = resolution.x / resolution.y; vec2 uv = gl_TexCoord[0].xy;// normalize uv -= vec2(0.5); // account for aspect ratio uv.x *= aspect; vec2 center = vec2(horz_center / 100.0, vert_center / 100.0); vec2 dir = normalize( center - uv ); float d = length( center - uv ); float factor = 0.5 * intensity/100.0; float f = exp( factor * ( d - radius/200.0 ) ) - 1.0; if (d > radius/200.0 ) f = 0.0; vec2 halfPixel = vec2(0.5, 0.5) / resolution.xy; // account for aspect ratio uv.x /= aspect; // de-normalize uv += vec2(0.5); uv.x = clamp(uv.x, 0.0 + halfPixel.x, 1.0 - halfPixel.x); uv.y = clamp(uv.y, 0.0 + halfPixel.y, 1.0 - halfPixel.y); gl_FragColor = texture2D(tex0, uv + f * dir );}
Example Code 2:
/*
TT Bulge Distortion - Fragment Shader
version v1.0
Created for Isadora by Mark Coniglio
Based on Code in GPUImage by Brad Larsen
https://github.com/BradLarson/GPUImage
*/
// ISADORA_PLUGIN_NAME("TT Pinch Distortion")
// ISADORA_PLUGIN_DESC("Creates a 'pinch' effect centered at the point specified specified by the 'horz center' and 'vert center' inputs. You can adjust size and intensity of the pinch using the 'radius' and intensity' inputs.")
// ISADORA_FLOAT_PARAM(radius, radi, 0, 200, 100, "Radius of the pinch effect.");
uniform float radius;
// ISADORA_FLOAT_PARAM(intensity, intn, -1000.0, 1000.0, 100, "Intensity of the pinch effect.");
uniform float intensity;
// ISADORA_FLOAT_PARAM(horz_center, ctrx, -100.0, 100.0, 0, "Horizontal center of the pinch effect.");
uniform float horz_center;
// ISADORA_FLOAT_PARAM(vert_center, ctry, -100.0, 100.0, 0, "Vertical center of the pinch effect.");
uniform float vert_center;
uniform vec2 resolution;
uniform sampler2D tex0;
void main()
{
float aspect = resolution.x / resolution.y;
vec2 uv = gl_TexCoord[0].xy;// normalize uv -= vec2(0.5); // account for aspect ratio uv.x *= aspect; vec2 center = vec2(horz_center / 100.0, vert_center / 100.0); vec2 dir = normalize( center - uv ); float d = length( center - uv ); float factor = 0.5 * intensity/100.0; float f = exp( factor * ( d - radius/200.0 ) ) - 1.0; if (d > radius/200.0 ) f = 0.0; vec2 halfPixel = vec2(0.5, 0.5) / resolution.xy; // account for aspect ratio uv.x /= aspect; // de-normalize uv += vec2(0.5); uv.x = clamp(uv.x, 0.0 + halfPixel.x, 1.0 - halfPixel.x); uv.y = clamp(uv.y, 0.0 + halfPixel.y, 1.0 - halfPixel.y); gl_FragColor = texture2D(tex0, uv + f * dir );}
- Try using 3D
-
Wow - thanks you! I will attempt... what a wonderful group of people work with Isadora!
MBP'21- M1-Max; Sonoma 14.7; Isadora: 4.5.1 (ARM) ---- artwork: terragizmo.net
-
Another option worth looking at is chaining together IzzyMap mappings. I find this adds more flexibility.
I often use one projector to mask and place my mapping content. This projector is sending to a virtual stage.
Then I use Get Stage Image to grab that IzzyMap work, and feed it into a second Projector where I use IzzyMap to Grid Warp as required.
I find this 2 phase approach to be much less confusing and easier to update over time.🎛️ TroikaTronix Professional Services
https://troikatronix.com/professional-services🎫 Support Tickets
https://support.troikatronix.com/support/tickets/new💻 Add-ons
https://troikatronix.com/add-ons/?u=dusx🧪 GitHub Projects
https://github.com/rwebber🖥️ Win11 | i7 | RTX 4070 | 32GB RAM | Ontario, Canada
-
@dusx Well I sure hadn't thought of that approach! I'll give it a try - thanks
-
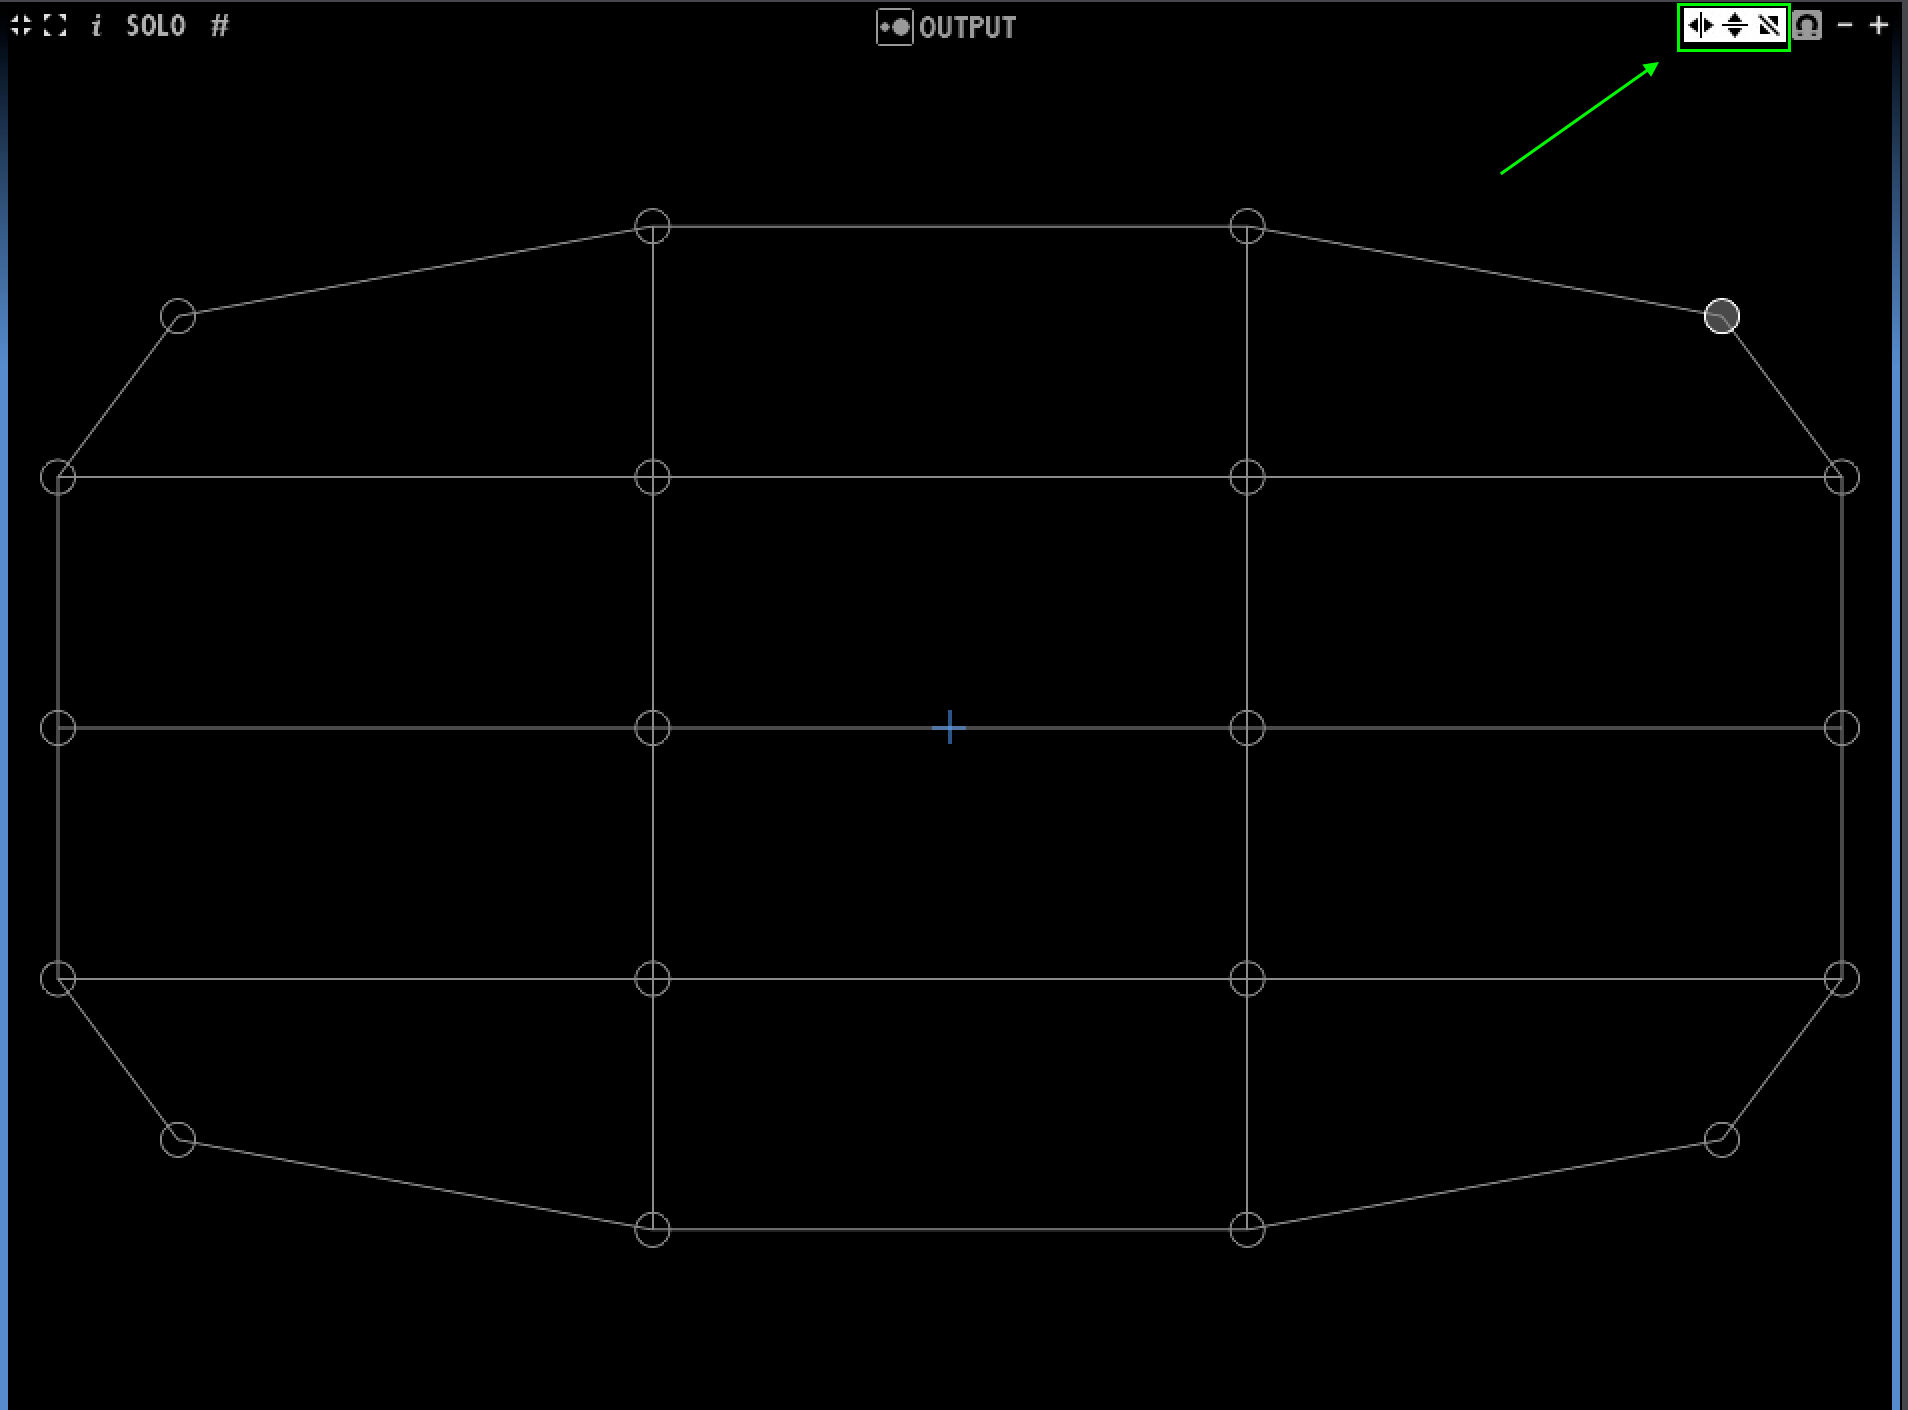
@dusx And a secondary question about grid mapping... not sure how to ask, but if one has a 6 x 6 square grid, is there any way to grab and move one of the corners and all the other grid lines will warp proportionally? Or is grid a point by point process?
MBP'21- M1-Max; Sonoma 14.7; Isadora: 4.5.1 (ARM) ---- artwork: terragizmo.net
-
as far as I know, grid mapping is done on individual points, but it would be really useful if other points could react - it would be a bit like the 'smudge' tool in photoshop.
-
Yes and no. If you select multiple points (using the Shift key) and hold and drag a line between the selected points, all the selected points will move together. No, you can’t change the curve for several points. You can only do this for each point individually. Unless I didn't find how.
Best regards,
Jean-François
-
Attached is a column made with Izzy Map and the Global Edge Blend Mask to make a shadow. Works if you don't need another background as black
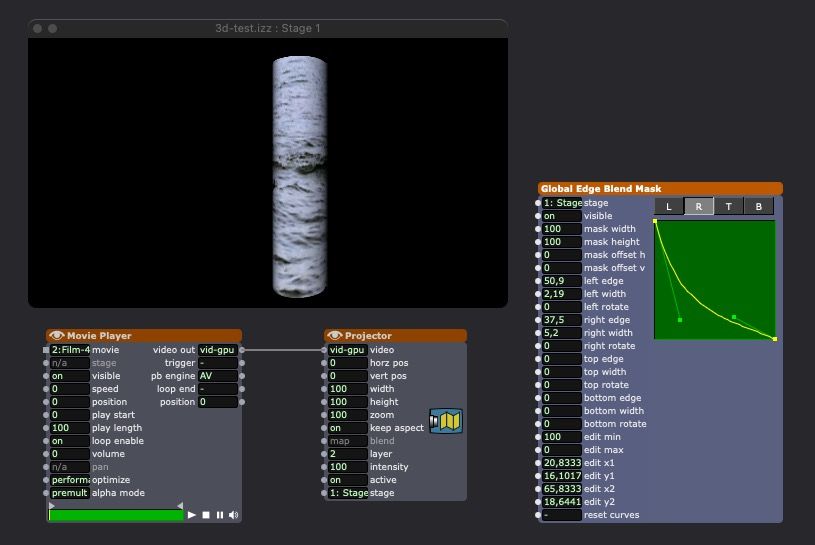
you can also use the Edge Blend Mask actor instead of the global one.
I join a 3ds column if you prefer to use a 3d projector. You don't need the jpg file for Isadora but you must use it (or another one) as a texture in the 3d programm for the video texture to work. If you don't have the jpg file in the same folder as the 3ds file, you will get an error message in Isadora. Don't care and go ahead. If you have the JPG file, it will no longer be visible afterwards.
• Izzy 4
- MacBook Pro M1 Max 16" 64GB RAM, Mac OS 15.3.2 Sequoia
- Mac Pro 5.1 middle 2012 (3,33 GHz 6-Core Intel Xeon, 32GB RAM, Radeon RX 580 8 GB ),
Mac OS 10.14.6 (Mojave)
- Mac mini Pro M4, Mac OS 15.3.2 Sequoia- A range of deployable older Macs
Located in Bremen, Germany
- A range of deployable older Macs
-
@jfg Thank you thank you! Not only did these insightful suggestions solve my problem, but they offer me new avenues and ideas about the next project / possibilities. Isadora is so deep, yet at times stubborn - but there is almost always a path to success.
-
@jjhp3 said:
is there any way to grab and move one of the corners and all the other grid lines will warp proportionally
These little guys control the different types of mirroring (horizontal, vertical, and diagonal):
-
@jjhp3 said:
point by point process
Yes, only the selected points will move, and they all move the same amount. I 'stretch' type move would be a great feature request though. I will add this.