[ANSWERED] How to change the blend mode in a projector that is mapped with izzy in a user actor
-
hi @alice
First it' s super smart to encapsulate a user actor for projectors to be able to reshape your mapping of all patch projectors at once !
here I'm testing blend modes of my Projector user actor but it works fine from one scene to another...
could you send us your patch?
MBP 2019- 16' (16,1) i9 2,3 GHz, 32 Gb /Radeon pro 5550M 8GBram/ OSX 10.15.3
Equip.: kinect 360 1414/ Leapmotion / Myo Armband /Wiimotes/ Saitek Joysticks ( X, evo, throttle) /Ipad / enttec dmx usb pro -
when you are on the output mapping window, you can control click on each point and publish the x/y of each point. than you can use the user input actor to control each value from outside your user actor. You can rename each user input.
greetings Matthias
-
Sorry but it is not true. Alice is right. After you open the IzzyMap window (double click on the projector) the blend input is greyed and the changes you made doesn't affect the projection mode. You have to reopen the Map window to make changes.
Unfortunately I don't know a solution or what do you made to make it working?
best
Jean-François
-
You can change the blend mode of slices inside a mapped Projector by clicking on the slice and changing the blend mode inside IzzyMap: Example Gif
This means you can:
- Use your original mapping slice with the blend mode set to additive inside IzzyMap
- Right-click on the original mapping slice in IzzyMap and publish the intensity of the additive mapping slice
- Now you have a new input on the Projector actor that controls the intensity of the additive version of this mapping slice (you can incorporate this into your User Actor by adding a new User Input inside the User Actor and connecting it to this new input on the Projector actor)
- Duplicate your original mapping slice (so you can make an identical one with the blend mode set to transparent)
- (Optional) Rename the copied slice "Transparent" for the sake of clarity
- Change the blend mode of the copy to Transparent
- Click the little "S" to the right of the transparent slice in the list of slices to enter Solo
- Now that you're in Solo, you can right-click the transparent slice and choose to publish the intensity of the transparent slice
- Now you have a new input on the Projector actor that controls the intensity of the transparent version of this mapping slice (you can incorporate this into your User Actor by adding a new User Input inside the User Actor and connecting it to this new input on the Projector actor).
- Final result: You have new inputs you can use to bring up additive or transparent versions of your mapping slice.
-
[EDITED - @Woland has a posted a solution below that is probably better - I'l leave this up though in case it's still of interest]
Here's another couple of approaches you could try as well:
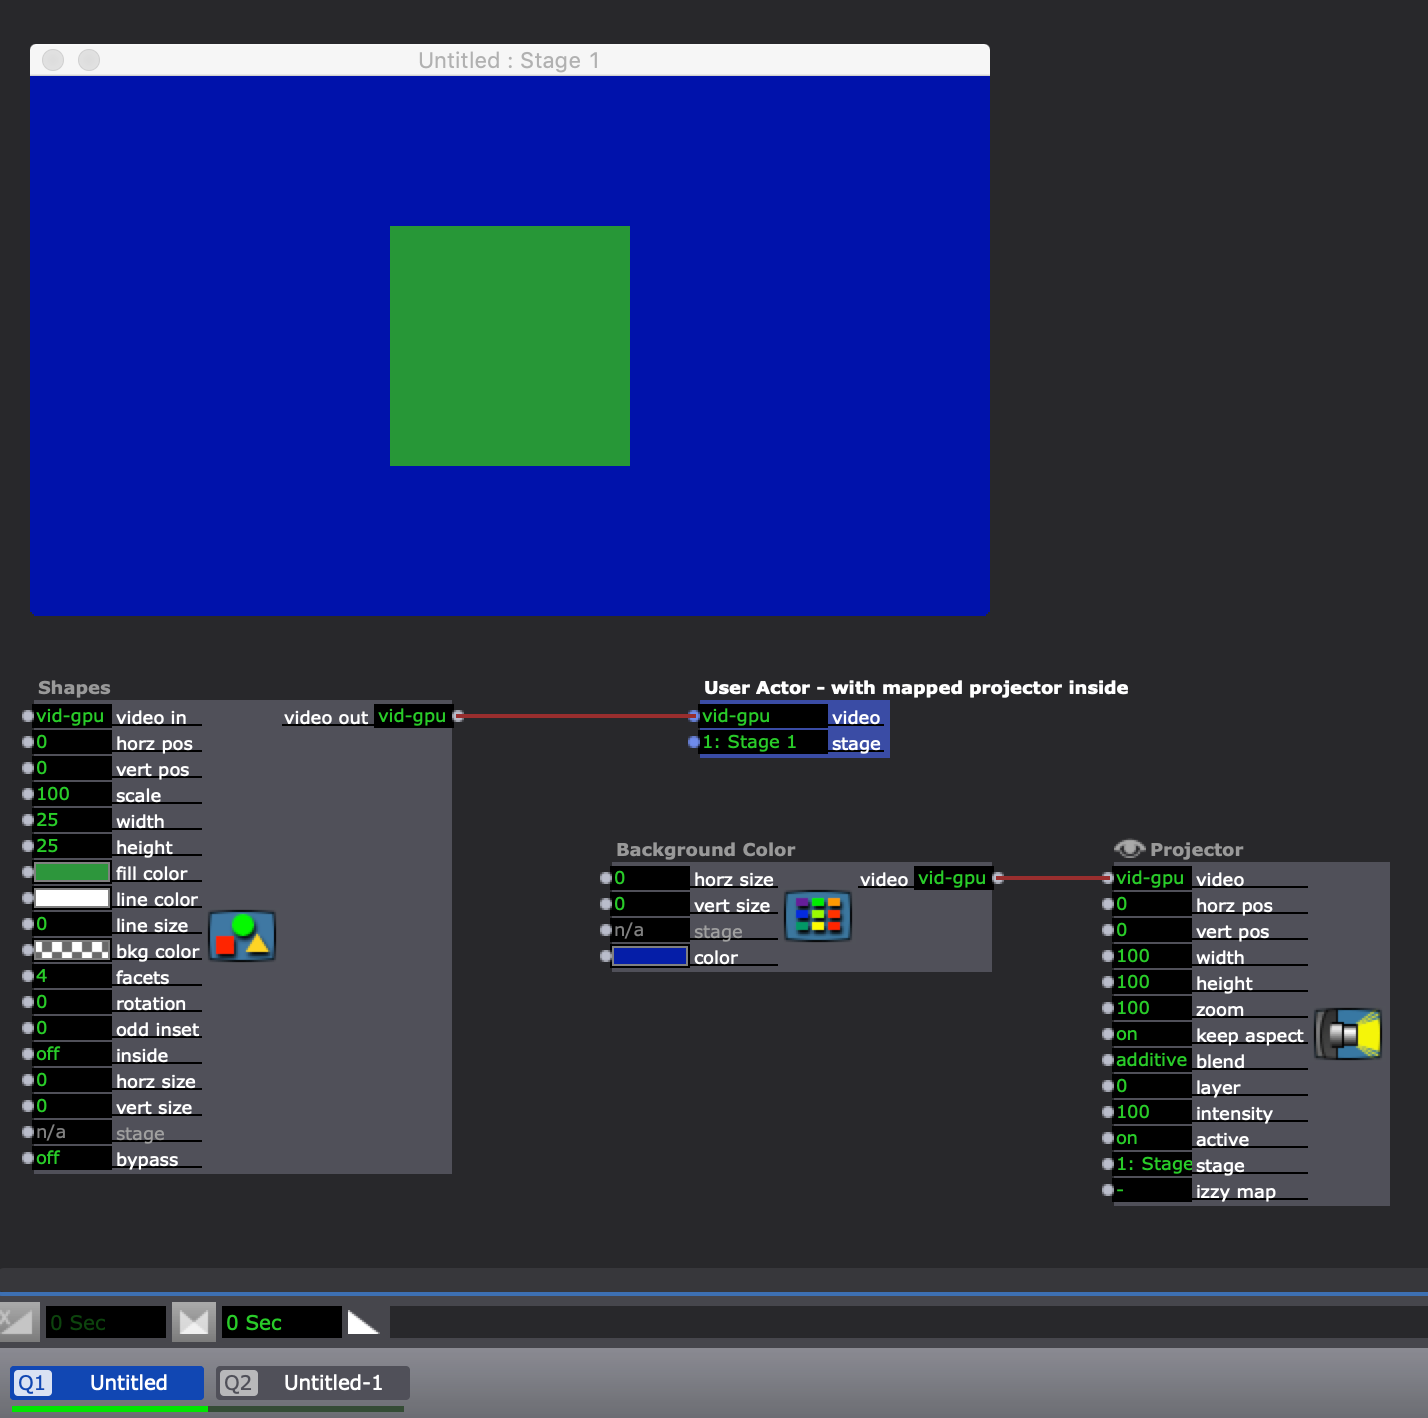
1) Create two user actors, one for each blend mode. It's not perfect I know as you'd need to map twice, but that's better than having to map 50 times. You could also copy and paste the mapping components (rectangles, grids, etc) from your first user actor to your second.
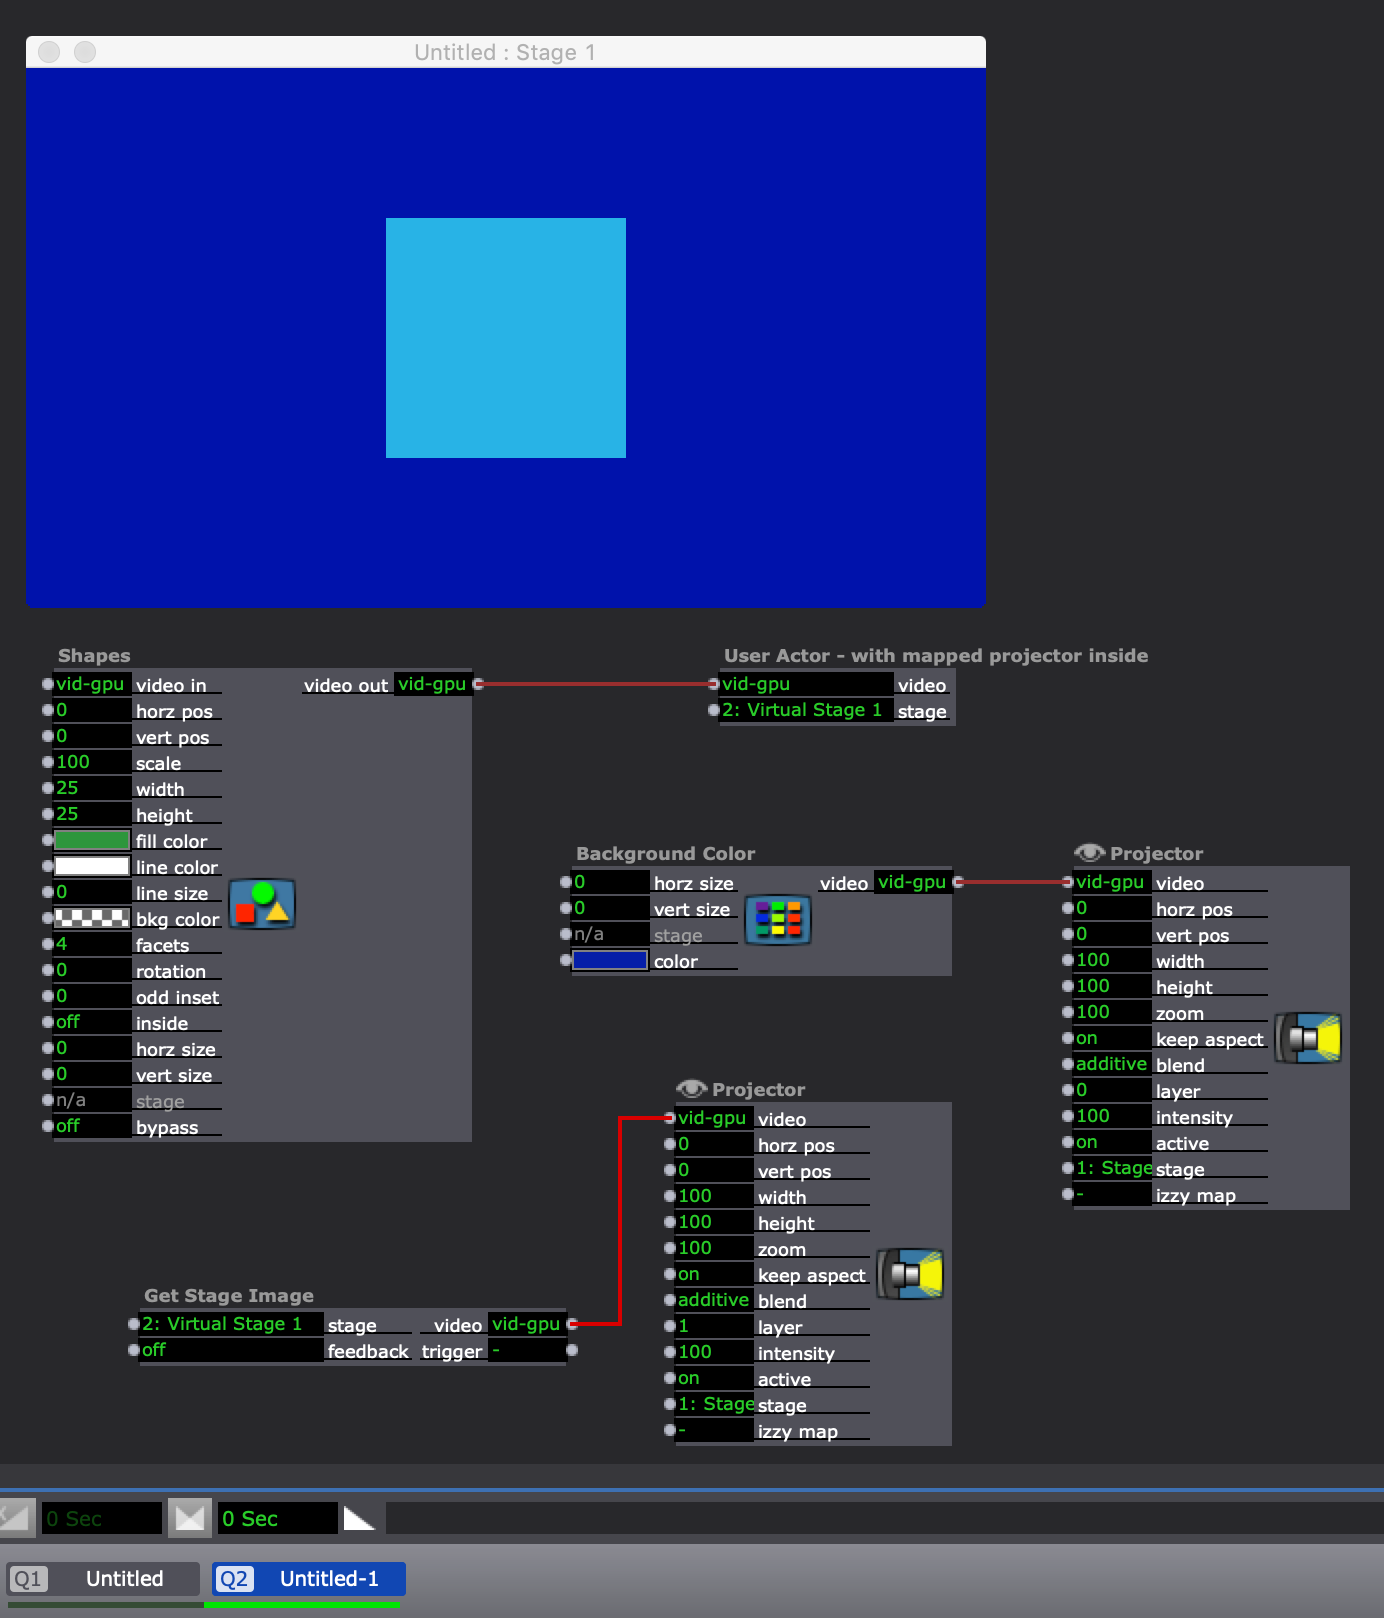
2) This is probably the neater option. Use a virtual stage, you can set this up in Output -> Stage Settings, making it the same size/resolution as your main output. Build one user actor containing your mapped projector with the blend mode set to transparent. Connect a User Input to the Stage input of the projector so you can dynamically select which stage it is sending to. In your scenes when you want a transparent blend mode just use the user actor as normal with the stage set to your main output stage. When you want to use an additive blend, set the projector to the virtual stage and use a 'Get Stage Image' actor to bring this back into your patch. You can then connect this to a projector set to the main output and select which ever blend mode you like.
2014 MBP Mojave 10.14.6 OS with 16GB, 2.5Ghz i7 quad core, Intel Iris Pro 1536 & Geforce GT 750m 2GB - Izzy 3.0.8
Gigabyte Brix Windows 10 with 32GB, i7-6700 quad core, 4GB GeForce GTX 950 - Izzy 3.0.8
Based in Manchester, UK. -
@kathmandale said:
It's not perfect I know as you'd need to map twice
You don't necessarily need to map twice. If you use my method of duplicating your original mapping slice, changing the blend mode on the copy, and then publishing the intensity of both slices as inputs on the Projector actor, then you have identical mapping slices inside the same projector and can control both from the same User Actor. If you need to update the mapping, all you need to do is:
- In the Scene Editor, double-click your User Actor to open it.
- In your User Actor, double-click the Projector to open IzzyMap.
- In IzzyMap, delete the transparent slice.
NOTE: The connection between your User Input for controlling the intensity of the transparent slice and the Project actor's input for the intensity of the transparent slice will be broken when you delete this transparent slice, so in step 10 you'll need to re-connect the User Input to the new input you'll have created for the new transparent slice's intensity. - In IzzyMap, make updates/changes to the mapping on the additive slice.
- In IzzyMap, duplicate the additive slice again (so you have identical mapping to use for the transparent slice).
- In IzzyMap, change the blend mode of the copy to Transparent.
- In IzzyMap, enter Solo for the transparent slice
- In IzzyMap, publish the intensity of the new transparent slice
- Exit IzzyMap
- Inside your User Actor, reconnect the User Input you have for the intensity of the transparent slice to the new input on the Projector actor for the intensity of the new transparent slice.
- Exit and save your User Actor.
TroikaTronix Technical Support
New Support Ticket: https://support.troikatronix.com/support/tickets/new
Support Policy: https://support.troikatronix.com/support/solutions/articles/13000064762
Add-Ons: https://troikatronix.com/add-ons/ & https://troikatronix.com/add-ons/?u=woland
Professional Services: https://support.troikatronix.com/support/solutions/articles/13000109444| Isadora Version: all of them | Mac Pro (Late 2013), macOS 10.14.6, 3.5GHz 6-core, 1TB SSD, 64GB RAM, Dual AMD FirePro D700s |
-
thanks @Woland I've edited my post above to suggest using this solution instead, it's much neater!
2014 MBP Mojave 10.14.6 OS with 16GB, 2.5Ghz i7 quad core, Intel Iris Pro 1536 & Geforce GT 750m 2GB - Izzy 3.0.8
Gigabyte Brix Windows 10 with 32GB, i7-6700 quad core, 4GB GeForce GTX 950 - Izzy 3.0.8
Based in Manchester, UK. -
There's almost always multiple ways to skin a cat when it comes it Isadora. Your approach of using Virtual Stages and the Get Stage Image actor is more powerful, offers a lot of flexibility, and is a great contribution to the discussion, especially since @alice is a bit new to Isadora. For this specific use-case my solution may be more efficient, but I'd argue that knowing how to use the Get Stage Image actor and Virtual Stages is far more useful overall for a number of other use-cases, so thank you for bringing it up.
TroikaTronix Technical Support
New Support Ticket: https://support.troikatronix.com/support/tickets/new
Support Policy: https://support.troikatronix.com/support/solutions/articles/13000064762
Add-Ons: https://troikatronix.com/add-ons/ & https://troikatronix.com/add-ons/?u=woland
Professional Services: https://support.troikatronix.com/support/solutions/articles/13000109444| Isadora Version: all of them | Mac Pro (Late 2013), macOS 10.14.6, 3.5GHz 6-core, 1TB SSD, 64GB RAM, Dual AMD FirePro D700s |
-
Thank you all! I will try all of the solutions and see what fits.. haven't used virtual stage yet so I will check a few tutorials
I'll get back to you : )
-
@woland hi do you why it's not possible to change this blending mode once it's connected to the user actor output? thx
MBP 2019- 16' (16,1) i9 2,3 GHz, 32 Gb /Radeon pro 5550M 8GBram/ OSX 10.15.3
Equip.: kinect 360 1414/ Leapmotion / Myo Armband /Wiimotes/ Saitek Joysticks ( X, evo, throttle) /Ipad / enttec dmx usb pro -
@bennnid said:
do you why it's not possible to change this blending mode once it's connected to the user actor output?
It is possible to change the blend mode of a Projector actor that has no mapping when you put it into a User Actor and connect a User Input actor to it.
When you add mapping to a Projector actor, the Blend Mode input on the Projector actor gets grayed out and cannot be used because as soon as you add mapping, each individual mapping slice has its own blend mode and you may want to mix them.
Currently, this blend mode can only be changed manually for each slice by entering IzzyMap, but I just logged a feature request to allow this parameter to be published like the other parameters of each slice. I also logged a feature request to allow the publishing of Sub-Slice Options (Add, Subtract, Invert) for Composite sub-slices.
TroikaTronix Technical Support
New Support Ticket: https://support.troikatronix.com/support/tickets/new
Support Policy: https://support.troikatronix.com/support/solutions/articles/13000064762
Add-Ons: https://troikatronix.com/add-ons/ & https://troikatronix.com/add-ons/?u=woland
Professional Services: https://support.troikatronix.com/support/solutions/articles/13000109444| Isadora Version: all of them | Mac Pro (Late 2013), macOS 10.14.6, 3.5GHz 6-core, 1TB SSD, 64GB RAM, Dual AMD FirePro D700s |
-
thanks for explaining ! and thanks so much for the feature request !